Muscle Performance Testing: Create Your Own Dynamometer

A Brief History of Strength Testing
Manual Muscle Testing
Manual muscle testing (MMT) is a widespread, nearly universal test used by physical therapists and other allied health professionals to determine muscle strength and weakness in their patients. Henry and Florence Kendall standardized and popularized the test in the 1940s during polio outbreaks. MMT was a quick, simple, and reliable way to check each muscle group for the primary effect of polio: muscle weakness.1
There’s a flaw with MMT, however. These procedures may not be very accurate in those with higher levels of strength, a fact we have known for quite a long time. In 1956, Beasley found that manual muscle testing was only able to detect weakness in knee extensors once the difference between sides was greater than 50 percent.2 Today, manual muscle tests are known as good tests for weakness, but it’s well-known that they are not so accurate when it comes to assessing strength.
One useful way to utilize MMT is to test qualitatively for contraction quality, timing, and compensation of other muscle groups. For example, when testing the gluteus medius, the stabilizing hand can be used to palpate the target muscle, as well as common muscles of compensation such as the quadratus lumborum and/or tensor fascia lata. This way, the practitioner can gain insight into the patient’s neuromuscular patterns and determine if the patient has excessive use or activation of other muscle groups.
Dynamometry
The next gold standard developed for muscle strength testing was dynamometry, which used large, expensive machines to measure force production. Common makes include BioDex or KinCom isokinetic dynamometers.
As technology progressed, handheld isometric dynamometry (HHD) became the standard. These devices are very accurate and have been shown to have high levels of inter-rater and intra-rater reliability, above 0.9 in one study.3, 4 This means that there is above 90 percent agreement between two practitioners testing the same patient, as well as one practitioner testing the same patient on two different occasions. For reference, reliability of greater than 0.75 is considered very good.
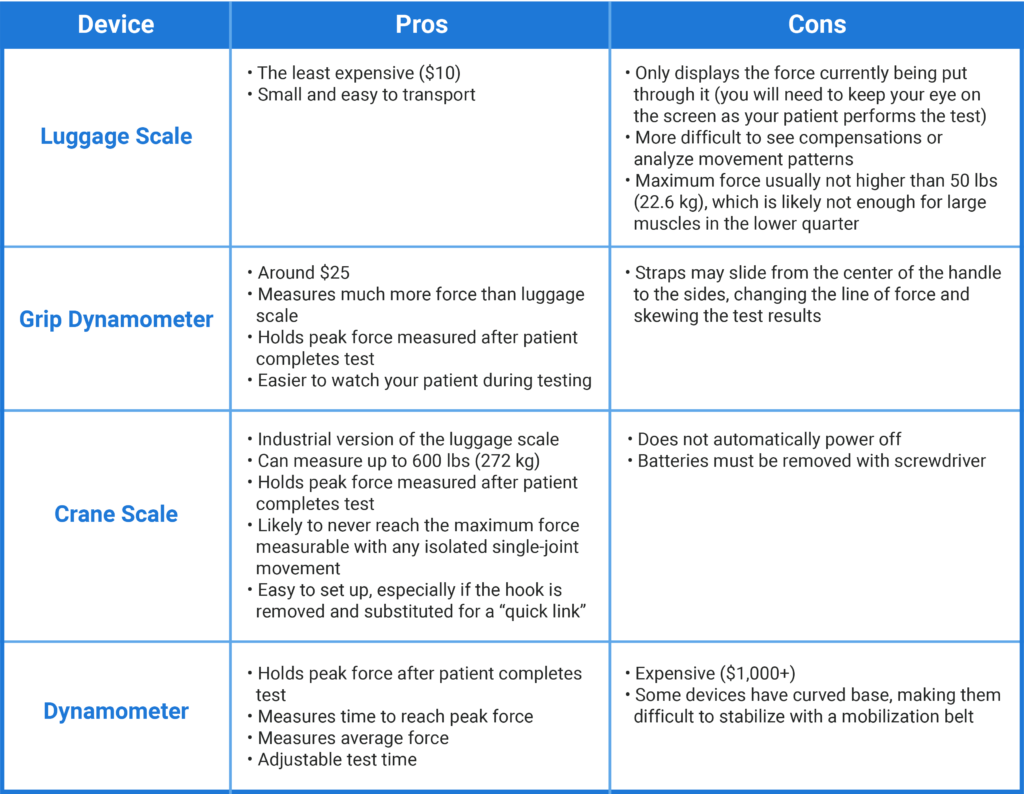
Although they are accurate, the high cost of each unit (often $1,000+) is prohibitive for the average clinician. However, with a little creativity, one can make their own handheld dynamometer for any muscle test with a much smaller initial investment.

The Movement Systems Approach to Strength Testing
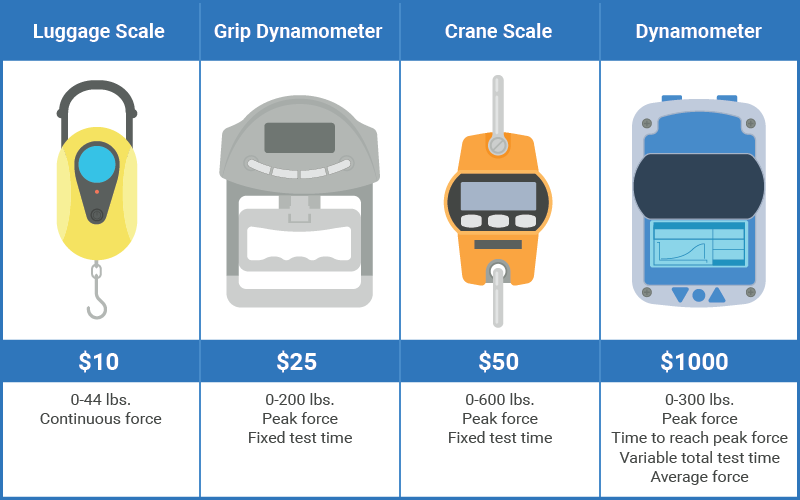
With the image above and the videos below as a reference, you can use a luggage scale, grip dynamometer, or crane scale to create your own MMT dynamometer set-up for your practice.
The basic idea is to attach it to a sturdy object, like the frame of a metal treatment table, and have your patient pull against a strap that you’ve attached to the device with a maximum force contraction. This strap can be a lashing strap or standard nylon mobilization belt.
You must always standardize the position of the patient and the joint angle you are testing at as well as make sure that the line of force is parallel to the device and perpendicular to the movement of the joint at that position. Each device has its own pros and cons, detailed below. My tool of choice for manual muscle testing is a crane scale. Click here for an example of a crane scale along with a screw-lock quick link that can be attached to the device

Once you are familiar with your device, the possibilities are limited only by your creativity! For example, if a movement analysis reveals limited scapular adduction in a throwing athlete, you can use your dynamometer device to measure the trapezius middle fibers muscle strength and find an objective strength rating. With the patient in the standard position (prone with glenohumeral joint externally rotated and at 90 degrees abduction), place a strap around the patient’s arm and attach it to the device. The device is attached at the other end with a strap secured by your foot on the floor. The patient is then asked to complete a maximal effort contraction against the straps. During this time, observe for compensations and then read the pounds or kilograms of force production. This is an easily trackable number and can help motivate patients to continue strengthening.
To see this example in action, as well as one for the lower extremity, watch the videos below.
Interpreting Your Results
How are these strength values interpreted? There are some normative values for commonly tested muscle groups, such as quadriceps and hamstrings; however, many smaller muscles may not have norms published. Additionally, in athletes, the weaker, dysfunctional side may actually still be stronger than the published norm!
The best reference is the patient’s non-involved side. Many clinicians assume that a greater than 10 percent difference between sides can be considered significant. There is no evidence that can be applied to ensure that this is accurate for all cases, but as a standard of practice, it is acceptable.
If the patient tests with greater than a 10 percent difference, they must be given a strength training program to improve strength and increase muscle hypertrophy. In order to do this, the dosage of specific exercise should be tailored to maximize strength and hypertrophy. The patient should perform two to four sets with ample rest time between (two to three minutes), and you should set the weight so that the muscle fatigues/fails somewhere between six and twelve repetitions.5 This means that the weight will be 67 to 85 percent of the maximum strength recorded in the MMT.6
One Step Further
With these methods, one can improve the objectivity, repeatability, and reliability of their strength testing for all patients. However, these are still isolated manual muscle tests and not functional strength assessments that recreate the actual activities the patient will be performing.
Other factors to think about include:
- Speed of force generation
- Open vs. closed kinetic chain testing
- Multi-joint vs. single joint movements
- Reaction time
To learn more about the Movement Systems approach, check out these articles:
- Kendall, F., McCreary, E., & Provance, P. (2010). Muscles: Testing and function with posture and pain (5th ed.). Philidelphia, PA: Lippincott, Williams, & Wilkins.
- Beasley, W. C. (1956). Influence of method on estimates of normal knee extensor force among normal and postpolio children. Physical Therapy Review, 36(1): 21–41.
- Jackson, S. M., Cheng, M. S., Smith, A. R., & Kolber, M. J. (2017). Intrarater reliability of hand held dynamometry in measuring lower extremity isometric strength using a portable stabilization device. Musculoskeletal Science and Practice, 27: 137–141.
- Kim, S.-G., Lim, D.-H., & Cho, Y. H. (2016). Analysis of the reliability of the make test in young adults by using a hand-held dynamometer. Journal of Physical Therapy Science, 28(8): 2238–2240.
- Kraemer, W. J., & Ratamess, N. A. (2004). Fundamentals of resistance training: Progression and exercise prescription. Medicine & Science in Sports & Exercise, 36(4): 674–688.
- Baechle, T. (2008). Essentials of strength and conditioning (3rd ed.). Champaign, IL: NSCA Human Kinetics.

